Generate radio coverage maps with SPLAT!

 Posted by:   Posted on:    No comments

SPLAT! is a cross-platform, open-source software that can be used to analyze a radio link between two locations and to generate coverage maps of RF transmitters. Coverage maps are calculated using Longley-Rice Irregular Terrain Model (ITM) algorithm. SPLAT! can predict RF coverage for any frequencies between 20 MHz and 20 GHz. It is thus useful for ham radio, broadcast radio, terrestrial television and wireless networks.

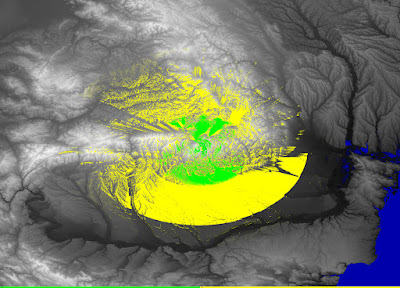
To use SPLAT!, you need to know some parameters of the transmitter. These are the exact location (coordinates), antenna height, transmission frequency, polarization and effective radiated power (ERP). SPLAT! can then compute coverage maps. The procedure of installing SPLAT! is described in a previous article. You can generate two kind of maps. There is the regional coverage analysis mode that will output line-of-sight coverage map assuming all waves propagate in a straight line. There is also the path loss analysis mode that uses the ITM algorithm to compute either a field strength map or a received signal strength map.
Install Sky Digital Key (AverMedia A867) on PC

 Posted by:   Posted on:    4 comments
Sky Digital Key is an USB DVB-T tuner designed to be used with this provider's satellite receivers. There are two variants, one with green LED and the other with blue LED, the last being an AverMedia device with Maxlinear MxL5007T tuner and Afatech AF9035 USB demodulator.

The DVB-T key can be installed on PC too. However the driver installation is not quite straightforward. The device is a copy of AverMedia AverTV Volar HD Nano with two small differences: there is no remote control sensor on Sky key although the PCB has the pads for it and USB IDs are different for the two devices. This aspect makes drivers installation difficult.

This article will describe the installation procedure on Linux and Windows. The USB tuner can be used to receive DVB-T signals with BDA compatible software on Windows (such as ProgDVB) and Kaffeine on Linux.

Install Sky Digital Key (AverMedia A867) on PC
AverMedia A867 - Sky Digital Key

Show last updated date in Blogger posts

 Posted by:   Posted on:    9 comments
Although this is not the kind of post for this blog, I decided to write about this because there are opinions saying it is impossible to show updated date in Blogger posts. Blogger offers support only for the date when a post is published. You can, of course, edit the post and change published date, but that is not what most people want.
The method that follows is completely automatic and it will print the last date when you used the post editor on the specific post. It makes use of data stored in blog feed, because, although there is no tag for updated date in Blogger (something similar to published date tag data:post.timestamp), the updated date is stored in your blog feed. I first noticed this when I registered my blog on Tapatalk and noticed that updated posts appeared on top of the list.
Show last updated date in Blogger posts

Remove non-latin fonts from Ubuntu

 Posted by:   Posted on:    7 comments
The default Ubuntu installation comes with a lot of fonts. This is a good thing. Many of the latin have good support for Extended character sets. But no matter what locale and/or installation language you choose, Ubuntu will install by default some non-latin fonts for Japanese, Thai, Ethiopian, Myanmar, Lao, Tibetan, Korean, Punjabi, Sinhala, Arabic and Khmer languages.

I don't know whether these fonts are ever needed by the operating system (i.e. for the language choosing settings or for displaying some web pages) but as a latin alphabet user I don't need them and I didn't like the fact that they were cluttering my font selection dialog without being of any use to me. So I decided to uninstall them.

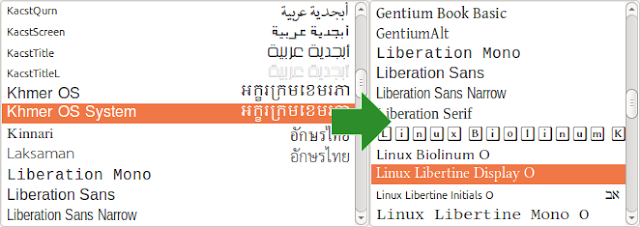
The list below is tested on Ubuntu 16.04. I managed to free about 100 MB by removing these fonts. And now, my font selection box (in LibreOffice, GIMP, Inkscape, etc.) is filled with latin only fonts that I can use. You can see in the screenshot below how it looks before and after removing the unneeded fonts.

Remove non-latin fonts from Ubuntu

Radio link analysis using SPLAT!

 Posted by:   Posted on:    No comments
SPLAT! is a cross-platform, open-source software that can be used to analyze a radio link between two locations and to generate coverage maps of RF transmitters. Coverage maps are calculated using Longley-Rice Irregular Terrain Model (ITM) algorithm. SPLAT! can predict RF coverage for any frequencies between 20 MHz and 20 GHz. It is thus useful for ham radio, broadcast radio, terrestrial television and wireless networks.

To use SPLAT!, you need to know some parameters of the transmitter. These are the exact location (coordinates), antenna height, transmission frequency, polarization and effective radiated power (ERP). SPLAT! can then calculate both path loss and received signal strength.

The procedure of installing SPLAT! is described in a previous article. The point-to-point analysis calculates some useful parameters like: azimuth and elevation of receiving antenna, distance to transmitter, mode of propagation, received signal strength and density. You must also supply a receiver parameters file to SPLAT!. This will contain the location, antenna height and some other terrain parameters. SPLAT! will generate a report and a graph if you have Gnuplot installed.

SPLAT! height profile graph

Compile and setup RF coverage prediction software SPLAT!

 Posted by:   Posted on:    12 comments
SPLAT! is a cross-platform, open-source software that can be used to analyze a radio link between two locations and to generate coverage maps of RF transmitters. Coverage maps are calculated using Longley-Rice Irregular Terrain Model (ITM) algorithm. SPLAT! can predict RF coverage for any frequencies between 20 MHz and 20 GHz. It is thus useful for ham radio, broadcast radio, terrestrial television and wireless networks.

SPLAT! uses data from SRTM elevation files. Although it is cross-platform, up-to-date binaries for Windows are hard to find. On the other hand, for Linux users, it is available in the repositories of the major distributions. This post will show you how to compile SPLAT! on Windows and Linux, how to obtain and convert elevation data and at last how to generate point-to-point and coverage prediction analysis.

There are two variants of SPLAT! based on the type of elevation data they use. SRTM3 files are 90 meters resolution, 3 arc-sec files. These are the "standard definition" files suitable for SPLAT! And there are SRTM1, 30 meters resolution, 1 arc-sec files that are considered "high definition" and are suitable for SPLAT! HD. I recommend SRTM3 (SD) files because the results are very good and processing time is not too high.

SPLAT! line-of-sight coverage

A better way to power car audio in home

 Posted by:   Posted on:    8 comments

Usually, car audio systems like CD player or cassette player have good audio amplifiers, with four channels (front L/R and rear L/R) of enough power for in home use. The radio tuner is also of high quality, with automatic best frequency selection and RDS information. Not all car audio systems have audio auxiliary inputs, although with a little tweaking, you can add audio line level inputs to a cassette player so you can use it as audio amplifier with any audio source.

There are plenty of how-to's about this subject. Yet I couldn't find one that handles the memory loss problem. Car audios are designed to be continuously powered by the battery. Therefore, most don't have a permanent storage memory for settings. Upon disconnecting the power, the device loses all audio settings and stored radio stations. This article will deal with the memory loss problem. Unless you will never unplug the DC adapter from the mains, you will need some kind of battery backup system. There are two approaches here: find and power only the CPU from battery or power the entire device from battery.

Car audio powered in home

Car audio powered in home

DC Motor Controller for PCB Drill

 Posted by:   Posted on:    No comments
This is a simple circuit that can be use to vary the speed of a DC motor. It is very useful for controlling a PCB drill, but it can be used for whatever applications you want. The speed can vary from full to complete stop. The circuit is versatile and can be used with motors of different currents and voltages.

This circuit is widespread on the internet. Here is an example. The PWM signal is generated by a 555 chip. The chip drives a MOS-FET transistor that will switch the motor on and off. The 555 is powered from a 7805 regulator. Therefore, the motor DC voltage can be between 8 and 35 V (the circuit can be powered by AC 7...26 V). The maximum current is limited by MOS-FET.
The circuit shown here is designed to be AC powered by a mains transformer. But you can power it from a DC adapter, battery or even a computer power supply if you remove the diode bridge and connect the power lines straight to ground and positive pads, where the output pins of the bridge would otherwise fit.
DC Motor Controller for PCB Drill 555

How to control the (BS2)S7VZ6306 tuner

 Posted by:   Posted on:    4 comments
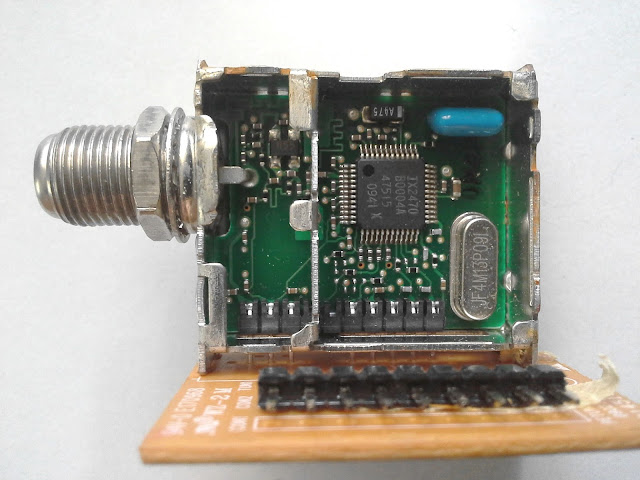
S7VZ6306 is a tuner I found in a Comag SL100 HD satellite receiver. A very useful thing is that the tuner is soldered onto a small board that is plugged into the main receiver board using a connector. So you can take it out easily to replace it or use it in a project. Information contained in this article applies to any satellite tuners that use IX2470 PLL circuit.

The tuner is half-NIM type (without included demodulator - the demodulator IC is on the main board). Although I could find no datasheet of the tuner, the manufacturer has written pin labels on the small PCB where the tuner is soldered. When opening it, I could find an IX2470 integrated circuit. No datasheet for this one either. Digging deeper, I found that this IC was used in some TBS PC tuner card and there are open source drivers for it. Pinout and software - that's all I needed to control the tuner outside of the original box.

How to control the (BS2)S7VZ6306 tuner

Install CadSoft EAGLE on Linux

 Posted by:   Posted on:    No comments
EAGLE is a complete EDA software with schematic capture and printed circuit board design. It has a free version that can be used for personal and non-commercial purposes to design circuit boards smaller than 100 x 80 mm and with no more than two copper layers. Another advantage of EAGLE is that it runs on all major operating systems.

The Linux version is supplied as an architecture dependent self extracting run archive. It can be installed on most distros by executing the downloaded file. There is however one small issue. The installer does not create a desktop entry for the main EAGLE executable. Therefore you have to navigate to the folder where it is installed each time you want to launch it.

Besides showing how to install it (on Ubuntu), this article will give you a simple desktop entry file that will bring a shortcut to EAGLE in your distro application menu. Note that you will have to change version numbers accordingly, because EAGLE is updated frequently.

Install CadSoft EAGLE on Linux

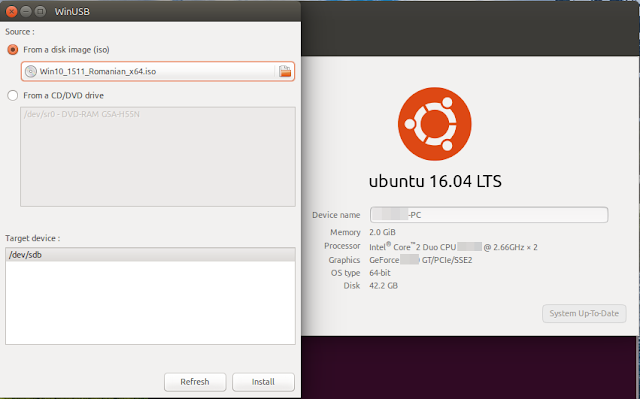
Install WinUSB on Ubuntu 16.04 LTS

 Posted by:   Posted on:    No comments

WinUSB is probably the only GUI tool that allows you to create bootable USB drives with Windows from Linux. It hasn't been updated for a long time and there are no packages for newer Ubuntu versions. Until the release of 16.04, WinUSB could be installed from existing DEB packages for previous Ubuntu releases. But things have changed with the update of wxWidgets to version 3.0 in the default repositories. WinUSB GUI depends on wxWidgets > 2.8.4 and all curent builds are based on 2.8 releases of the library.

Let's mention again that WinUSB can't make UEFI bootable drives! Only the old MBR type and only NTFS formatted.

This guide has also been tested on Ubuntu 16.10. If you're using an older version of Ubuntu you may get WinUSB working by following this guide. Otherwise, you need to compile it with wxWidgets 3.0. This article will describe the procedure plus the extra tweaks you must make to ensure WinUSB works as it should.

Install WinUSB in Ubuntu 16.04 LTS

How to build a low voltage soldering iron

 Posted by:   Posted on:    13 comments

Although soldering irons are quite cheap, widely available and come in various shapes and sizes, let’s try to make one from scratch. This involves some basic knowledge of electronics and some DIY abilities. However, please note that building electrical devices carries risks, and I recommend exercising caution to fire, burns, or other hazards.

This article will describe some simple to build soldering irons that can provide 15 – 60 W and are powered at low voltage (5 – 20 V, depending on heater wire you use). This means you can power it with any power supply that meets these requirements (a computer power supply or notebook charger will be a good choice because it is also short circuit protected).

Fix boot splash screen (Plymouth) on Ubuntu

 Posted by:   Posted on:    4 comments
Plymouth is the Ubuntu application that displays the graphical splash screen when booting and shutting down the system[1]. It is long known that it has problems with proprietary Nvidia drivers. While on some computers it starts in low resolution mode, on others it works in text mode. It is claimed that this happens because Nvidia drivers load at a later point and are not available for GRUB and Plymouth[2]. Usually, Plymouth uses KMS (Kernel Mode Setting) to display graphics, but with proprietary drivers you must configure it to use framebuffer instead[3].

Fix boot splash screen (Plymouth) on Ubuntu

Debrick Huawei HG553 (BCM6358 based router)

 Posted by:   Posted on:    10 comments

Huawei Echolife HG553 is an ADSL2+ modem with WiFi router which was used by some ISP companies in Italy and Spain. The device features a Broadcom BCM6358 dual core processor clocked at 300 MHz with 64 MB RAM. The operating system is stored in a 16 MB flash memory.

The original firmware doesn't offer too many options, but there are alternate firmwares, including OpenWrt which turns this router into a highly configurable network device. If you want to use it for ADSL line, Roleo firmware (D-Link based) is the best choice. For all the other things, OpenWrt remains the best option.

Unlocking and firmware installation procedures are described in various sites. One example is OpenWrt dedicated wiki page for HG553. This post will describe the ultimate debricking procedure: writing bootloader via JTAG. After an unsuccessful firmware update and a forced restart, my router became completely unresponsive. Neither the power LED was on when powered. Reset, Failsafe mode, Telnet for this device didn't exist anymore. In this cases, there is only one solution left: JTAG.

Debrick Huawei HG553 (BCM6358 based router)

Huawei HG553 main board

Simple DiSEqC monitor and signal analyzer

 Posted by:   Posted on:    No comments
DiSEqC™ is a protocol developed by Eutelsat. It is widely used in satellite receiving equipment to control devices over the same coaxial cable that carries RF signal. DiSEqC can be used to select a local oscillator of the LNB, to operate a LNB switch or to point a motorized dish.

But when a device communication fault arises, the source of the problem may be difficult to find. The coaxial cable that goes from receiver to accessories and finally to LNB carries multiple signals: the radio frequency signal from LNB to receiver, the power voltage from receiver to connected devices and LNB and the DiSEqC signal. Faults can be caused by receiver, cable, accessories (switch, positioner, motor) or LNB.

The simple computer adapter that will be described allows you to view and analyze DiSEqC waveform using the soundcard input and Audacity software. This is possible because the protocol is modulated over a 22 kHz carrier. The same carrier (when sent continuously, at a smaller amplitude) tells the LNB to switch on the high local oscillator.

Simple DiSEqC monitor and signal analyzer

6 PDF page cropping tools for Linux

 Posted by:   Posted on:    4 comments
If you ever needed to crop pages of a PDF document and you are using a Linux computer here are six tools that can help you. All are native Linux applications, some are opensource, but most important all are free.

I looked for the following features at these applications: the ability to select only a subset of pages from the document to crop, different crop boxes for each page and the way of selecting crop box (automatically, WYSIWYG or by measurement units).

Here are the six Linux applications that will help you when you need to crop a PDF. This is just a list, not a ranking.

6 PDF page cropping tools for Linux