Set up STM32 "blue pill" for Arduino IDE

 Posted by:   Posted on:    15 comments

The "blue pill" is a STM32F103 based development board. Although it is less popular, the board is cheaper than the Arduino Nano. More than that, STM32F103 is a device with Cortex-M3 ARM CPU that runs at 72 MHz, 20 kB of RAM and 64 or 128 kB of flash memory. The microcontroller (MCU) has USB port, two serial ports, 16 bit PWM pins and 12 bit ADC pins. It runs at 3.3V, but some of its pins are 5V tolerant.

Programming the board can be simplified using the popular Arduino IDE. But before this, an Arduino-like bootloader must be flashed to the board. This can be done via serial port or using the debug interface of the MCU with ST-Link tool. There are also some small hardware issues with Chinese boards that need to be fixed. This post will show a straightforward guide for setting up this board to work with Arduino IDE on Linux and Windows. The instructions below are based on STM32duino wiki [down?] documentation.
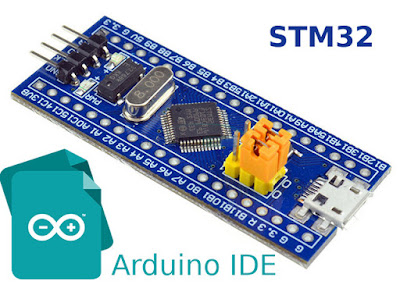
Important! There is now an officially developed Arduino STM32 boards package from STMicroelectronics. It is based on HAL and LL libraries. It is recommended to use that one instead. Please follow instructions from Program "blue pill" with STM32 Cores in Arduino IDE.
Set up STM32 "blue pill" for Arduino IDE

Driver and Arduino code for unipolar stepper motors

 Posted by:   Posted on:    No comments

A stepper motor is a brushless electric motor that rotates in small equal steps, as opposed to the continuous rotation of regular motors. It has the ability to rotate a predefined number of steps, which makes it useful for precision mechanical devices. To do this, it uses multiple coils that are energized in regular sequences by trains of digital pulses. The speed of these pulses determines the speed of the motor. The pulse sequence determines the rotation direction. Nowadays, you can find integrated drivers for all types of stepper motors. In this post you will learn to make your own driver and use the motor with a development board.

There are two main types of stepper motors. There are bipolar motors which contain two coils (4 wires). To drive this kind of motors, coils are energized one after another, then polarity is changed and the coils are energized again. Two H-bridge circuits are required in this case. Unipolar motors use two coils, each of them having a center tap. The center taps from both coils connect to a power line and the remaining four coil terminals are powered sequentially (5 wires). Unipolar mode simplifies a bit the driving circuit. Some manufacturers offer steppers that can be used either as unipolar or as bipolar. This kind of motors have the center taps not connected together (6 or 8 wires motor) and if the center taps are not used, the motor can be wired as bipolar.

Unipolar stepper driver built on perfboard

Unipolar stepper driver built on perfboard

Receive DRM Radio on Linux with Gqrx and Dream

 Posted by:   Posted on:    6 comments
DRM (Digital Radio Mondiale) is the universal, openly standardised digital broadcasting system for all broadcasting frequencies, including the AM bands, as well as VHF Bands. The great flexibility of DRM supports all types of coverage needs – from local, regional, nation-wide to international. If you want to listen to DRM broadcasts, you need a dedicated receiver or a software radio. This post will focus on the cheaper method, the software defined radio (SDR).

SDR performs demodulation in software. The RF signal is sampled by a high speed ADC (analog-digital converter) and sent to a computer which does the filtering, amplification, demodulation and decoding of the signal. The cheapest hardware for SDR is the popular RTL2832U based DVB-T stick.

Most DRM broadcast can be found in SW bands. Here comes an important issue. The tuner from the DVB-T stick can't receive this band. One of the solution is to add a frequency downconverter. Or you can simply disable the tuner and feed RF straight to the ADC. I wrote about RTL2832U direct sampling in this post. This method has some limitations, but nevertheless it should provide satisfactory results.

Dream decoding a DRM broadcast

Script to compile and install PulseView on Ubuntu

 Posted by:   Posted on:    2 comments
PulseView is an opensource GUI for sigrok. It displays recorded waveforms from logic analyzers and oscilloscopes and it can perform various signal measurements and digital protocol decoding. Being opensource and Qt based, it is also cross platform. You can find it in the Ubuntu repositories, but the version is rather old and you'll be missing some new features and protocol decoders.

You will find in this post a script based on building instructions from official sigrok/PulseView wiki that automatically downloads, builds and installs all required dependencies and PulseView itself. The script has been written and tested on Ubuntu 17.10 but it should work on other apt based distros.

Script to compile and install PulseView on Ubuntu